- [email protected]
- +353 (0)86 224 0139
- Free Shipping Worldwide

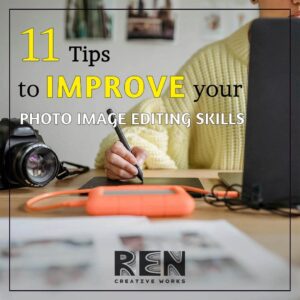
11 Tips to Improve Your Photo Image Editing Skills | Part 1
If you want to make a career out of photo and image editing, you must first ensure that your skills are up to par. Fortunately, there are some things you can do to enhance your skill set. With practice and the right advice, you will gain greater control over advanced editing software, so you can quickly become a master of your images. This will be a three-part series, so continue reading to learn about eleven essential tips to get you started.
Introduction: The Birth of Photo Image Editing
Many people have told me that they do not know where to begin with photo image editing. As a result, I am hoping that this three-part series will be useful and beneficial for everyone.
As a starting point for the discussion, the following reference appears to be most relevant. After centuries of chemical and optical developments, including the discovery of the camera obscura, the world’s first photograph, or at least the oldest surviving photograph, was taken.
The art of photography involves image manipulation, and photographers originally used airbrushes to correct their photographs.
Visual censorship has been utilised in political contexts throughout history, and was notably prevalent in the Soviet Union. This was most obvious during Joseph Stalin’s political purges, when the Soviet authorities attempted to erase some of the purged figures from Soviet history by distorting images and destroying film.
For example, after Stalin deported Leon Trotsky for failing to oppose his leadership, the Russian-Ukrainian Marxist revolutionary was clipped, airbrushed, and covered over in innumerable images. Not only that, but Stalin’s ‘cult of personality’ would have photo technicians position him in images at significant times in history, even making him look taller or more handsome.
However, since digital image editing technologies have evolved, this application has become outdated.
Unfortunately, airbrushing is still a little-known and little-loved genre of art. Airbrush artists, on the other hand, contribute a wide range of beauty and diversity to their work. This includes photorealistic works that cannot be differentiated from genuine photographs, as well as magnificent full-fantasy images, mixed or not with other art styles.
Smartphone Photography
Although not a new phenomenon, the quality of photography that is now achievable with smartphones would have been considered impossible only a few years ago.
The introduction of the first mobile cellular phones marked a significant milestone in global communication. However, another significant advancement in that area occurred in May 1999, when the Kyocera VP-210 was released in Japan. It was one of the first phones with an integrated camera to be commercially sold to the general public.
Early cameras had low mega-pixel resolutions, but it was enough to kick-start the mobile photography trend.
Technology and the internet have evolved in tandem, and this has changed the way we take photographs. Modern mobile phones are constantly evolving, and they can now shoot high-definition video as well as still images. The capacity to shoot high-quality photographs and films, using phones rather than bulky equipment, has fundamentally altered how we capture and use imagery, such as in social media posts.
A Good Photo Requires Good Photo Image Editing
In the world of photography and image editing, good editing skills are essential. With the right tools and techniques, you can turn a good photo into a great one. It can make or break the image. Editing is more than just cropping and applying filters; it is about enhancing and improving the photo.
Editing is a skill that requires both skill and patience. It takes time to learn how to edit photos so that they look better than they did before.
You can choose from a wide range of free editing software. If you want all the bells and whistles of latest features, you may have to purchase it outright or subscribe to it. Ensure that the software you choose meets your needs and your budget.
Post-Process Editing
The better the data captured from a camera to create the photo, the greater the possibility of enhancement. There are more and more cameras on the market that can capture RAW files.
A camera raw image file contains minimally processed data from the image sensor of a digital camera, motion picture film scanner, or other image scanner. Raw files are so named because they have not yet been processed and thus are not ready to be printed or edited with a bitmap graphics editor.
Normally, the image is processed by a raw converter in a wide-gamut internal colour space where precise adjustments can be made before being converted to a “positive” file format such as TIFF or JPEG for storage, printing, or further manipulation. Various manufacturers of digital image capture equipment use several raw formats.
I cannot stress the importance of this enough, but the most important thing is to start with a high-quality image. The higher the quality of the original image, the better the results will be. It is preferable to use an image with a much higher resolution than you require. Images can always be cropped down, but you cannot adjust upwards for pixels that are not there.
11 Tips for Better Photo Image Editing (Tips 1-3)
Do you feel every single photo you take needs to be touched up at least a little? Whether you are a professional photographer or just getting started, there are always ways to improve your photo and image editing skills. Here are my first three tips for improving your photo image editing skills:
1) How to Choose the Best Equipment for Photo Image Editing
Let us start at the beginning. The principles remain the same whether you are using a smartphone or a digital camera. Digital single-lens reflex cameras (DSLRs) are more advanced or professional digital cameras that allow interchangeable lenses on the same camera body.
Learn everything there is to know about your camera. Take some time to go over all of the features and options that are available to you. This will assist you in getting the most out of your equipment.
Although there are some excellent image editing apps for smartphones, editing images on a computer is always preferable.
Computer
I don’t want to get into a heated dispute about Mac vs. PC. However, I will state that I have used both systems, as well as several versions of Linux on a dual booting Windows PC. Nowadays, software is platform agnostic, and very few programmes are Mac-only or PC-only. Not only that, but more online editors are gaining influence, so all you need is an web browser and a good internet connection.
- Laptop or Desktop: If you’re not planning to use your computer on the go, don’t buy a laptop. A desktop computer is a far better buy. You will get the most power for your money if you simply edit at home. When it comes to computers, consumers must contend with both obsolescence and Moore’s Law, so get the best that you can afford.
- CPU: Purchase the most powerful central processing unit (CPU) you can afford. The processor handles the vast majority of photo editing work.
- Memory: You do not have to buy the most expensive computer on the market, but you will need a decent processor and at least 8 GB of random-access memory (RAM). While the exact amount of RAM required will depend on the size and number of images you will be working with, I would recommend at least 16 GB if possible. When you are trying to learn and work with a slow computer, it can be extremely frustrating.
- Storage: Choose a Solid State Drive (SSD), but don’t go overboard with the size. If you’re on a tight budget, a 512GB disc may be preferable to a 1TB drive. Then, for greater storage capacity, get a larger 7200RPM external drive. In other words, you can use an SSD for immediate editing while storing your work on a quicker but less expensive external disc. One of the most important tips I can give you is to invest in a backup storage drive.
Monitor
Now that the computer is taken care of, you have to think about the quality of the monitor. After all, what good is having the best computer if your monitor fails to display your images optimally?
What Is Refresh Rate And Why Does It Matter?
A display’s refresh rate is the number of times per second that an image is drawn. It is measured in Hertz. If your display has a refresh rate of 75Hz, for example, the image is refreshed 75 times per second.
When it comes to selecting a monitor, the refresh rate is critical. The greater the refresh rate, the smoother the visuals on the screen will appear. If you work on graphics design, video editing, or enjoy gaming, you should get a monitor with a high refresh rate to ensure that your work looks good and has no lag time.
When it comes to high-refresh-rate values, the higher the better, so search for anything from a typical 75Hz to an outstanding 390Hz.
What Is High Contrast Ratio and Why Does It Matter?
A high contrast ratio is a significant factor in the quality of a display. The difference between the darkest and lightest colour shades on a screen can be used to calculate it.
A high contrast ratio allows for darker blacks and brighter whites, rich natural colour saturation, well-defined shadow detail, and an image with strong three-dimensionality. This helps to alleviate eyestrain and fatigue when working on a computer for extended periods.
The higher the contrast ratio, the better; therefore, you should aim for numbers between a respectable 1000:1 and an extraordinary 4000:1.
Although partly related, another consideration if you are generating web content assets is the Web Content Accessibility Guidelines (WCAG). WCAG 2.1, for example, demands a specific contrast ratio for images and user interface components such as form input borders.
Why Should You Use a Monitor Hood When Editing?
If you have never seen one before, you might be wondering what a monitor hood is. A monitor hood, as the name implies, is a computer screen cover that serves to protect it from and block out external ambient light, such as sunlight or interior lighting.
External things that reflect on your screen can influence how you perceive colour, contrast, and so on. As a result, all editors who care about the quality of their work should consider getting a monitor hood. I have used these before and can attest that they make a significant impact in reducing screen glare.
After all, having a great display means nothing if you can not see a good image on your screen accurately.
How To Calibrate Your Monitor for Photo Editing
Display calibration is a vital step in getting the most out of your screen. Each monitor has a unique colour calibration. You should calibrate your monitor for photo editing if you want to view with optimal colour accuracy. Some monitors include software for calibrating your screen for maximum colour accuracy.
To make things easier for you, most image editors have an inbuilt calibration setup to calibrate the colours. This is usually found in the application preferences or by going to Edit > Colour Settings.
You may become overwhelmed by the numerous RGB and CYMK colour spaces available in the colour settings section. Essentially, each colour space has a slightly different range or subset of colours that may be accurately represented; this is known as the gamut. You should concentrate on either Adobe RGB 1998 or sRGB colour spaces.
Standard Red, Green, and Blue (sRGB) is a colour space, or set of particular colours, developed by HP and Microsoft in 1996 with the purpose of standardising the colours displayed by electronics. Although sRGB and Adobe RGB 1998 have the same number of colours, the sRGB range is narrower.
Adobe RGB 1998 is considered to have a 40% broader colour spectrum than sRGB. It was developed to include the majority of the colours available on CMYK colour printers, but on a device such as a computer display, by employing RGB primary colours.
Either type of RGB should be used for web photos, whereas CYMK should be used for either professional or home printing.
The CMYK abbreviation stands for Cyan, Magenta, Yellow, and Key, which are the printing colours. A printing press creates a picture from these four colours by using dots of ink printed at different angles that overlap. The word “key” literally means “black.” It is called “Key” because it is the primary colour used to determine the outcome of the image.
Furthermore, professional printers have preferences for the colour spaces they require, and depending on the printing process, may have minimum font size and line weight standards.
A display colorimeter, often known as a probe or puck, is a device used to calibrate and profile displays by measuring on-screen colour patches, colour, brightness, and contrast for each application. The colorimeter has an ambient light sensor that measures the light conditions and can automatically adjust the monitor to ensure consistent results. However, this device may be excessive if you are just starting out.ut.
A Graphics Tablet
My final piece of advice is to invest in a basic graphic tablet, especially if you are serious about image editing. Graphics tablets allow you to draw directly on the tablet screen, giving you complete control over your image editing. The pressure-sensitive stylus/pen expands the capabilities of image editing programmes and provides far more precision than a mouse.
2) Best Photo Editing Software for Beginners
As I mentioned earlier, there are numerous photo image editing software programmes on the market, and it can be difficult to determine which one is best for you. If you are just starting out, look for a programme that is simple to use and has many features. Once you have mastered the fundamentals, you can always explore and move on to more advanced features.
Since its release, there has been one piece of software that has dominated the market: Adobe Photoshop. The name of the software has become widely used as a verb, such as “to Photoshop an image,” or “you are not editing but rather “photoshopping.”
Photoshop is a raster graphics editor created by Thomas and John Knoll in 1988. Since then, the software has become the industry standard for not only raster graphics editing but also for digital art in general.
Just keep in mind that professional software has largely replaced priority licences and is now commonly sold via a subscription-based model known as Software-as-a-Service (SAS).
However, thanks to the open source community, some fantastic and equally good alternative free image editing programmes are available:
-
GIMP (GNU Image Manipulation Program) is a cross-platform image editor available for GNU/Linux, MacOS, Windows, and more operating systems. It is free software. GIMP offers a streamlined workflow, which is great for beginners. The customisable UI is also ideal for setting up an efficient workflow for online digital photography.
-
Photopea is a web-based photo and graphics editor that works with both raster and vector graphics. It can be used for image editing, illustrating, web design, and converting between image formats. Photopea is ad-supported software.
-
Blender: Although this programme is not an image editor, I have added it primarily because it is free and offers you an opportunity to explore the world of 3D computer arts.
- Ubuntu Studio is an open-source, free operating system designed for creative people, for artists by artists. It is a variant of the Ubuntu Linux operating system that is intended for all-around multimedia creation.
Once you have chosen the best photo editing software to suit your needs, just be aware of the following terms when you first begin because they frequently create confusion:
Raster Graphics
Raster graphics are digital images that are made up of a grid of pixels. This type of image is best suited for photographs and other images with complex colours and shading. Raster graphics are typically saved in formats like JPEG, PNG, or TIFF.
When editing raster graphics, it is important to be aware of the limitations of the pixel grid. You can only make changes to individual pixels, so it can be difficult to make global changes to an image without affecting the overall quality.
However, with some practice, you can develop your raster graphics editing skills and produce high-quality results. Raster-based software includes programmes such as Adobe Photoshop and GIMP.
Vector Graphics
Vector graphics are computer graphics images defined in terms of two-dimensional points that are connected by lines and curves to form polygons and other shapes. Each of these points has a distinct position on the work plane’s x and y-axes and determines the path’s direction; additionally, each path may have unique properties such as stroke colour, shape, curve, thickness, and fill.
Vector graphics have the advantage of being able to be scaled to any size without losing resolution. Vector-based software includes programmes such as Adobe Illustrator and Inkscape.
Get to know your editing software, and spend some time exploring all the features and options available to you. This will help you make the most of your editing tools.
3) Image Organisation
Image organisation is a necessary step before you can begin altering your images. It is the initial stage in the workflow, and it is critical to organise your files so that you can simply discover and update them.
Organizing photographs not only saves time and makes editing easier, but it also ensures the quality of your work.
Image organiser software, commonly known as image or photo management software, are tools for organising your digital image collection with some options to make small tweaks.
The central function of image organiser software is to improve the user’s productivity by making it easier to manage large numbers of photographs. Unlike an image viewer, an image organiser allows you to organise photos into folders, tag them with keywords, conduct rudimentary editing, and even automatically generate a timeline of when the images were taken. When you organise photographs using tags and metadata, you will be able to quickly find the image on your hard drive or online.
In many circumstances, you can export albums to various online services to view your photographs from anywhere in the world.
There are numerous ways to organise your images, but here are some suggested tools to get you started that will benefit you in the long run:
-
Adobe Lightroom is intended for image organisation and processing, and time management is critical when dealing with a large number of projects and files. (Photoshop, on the other hand, is an image editing, production, and enhancement tool.) You will need a digital darkroom alternative if you do not want to pay for a Lightroom subscription to manage and edit your photos.
For a comparable experience and alternative to Windows and Apple operating systems, you might wish to consider using Linux, particularly if you want to breathe life into an older PC. There are numerous versions of Linux available, but that is a whole different topic.
Some Linux desktop environment programmes were created to be simple image viewers but have since gained functionality that allows them to be used as image organisers.
-
gThumb is a free and open-source picture viewer and organiser with image editing capabilities. It has a clean and simple user interface and adheres to the GNOME Human Interface Guidelines (HIG); it integrates well with the GNOME desktop environment.
-
digiKam is another free and open-source image organiser and tag editor that works on the KDE desktop environment.
Digital Asset Management
Solutions for digital asset management (DAM) can help businesses manage larger and more varied digital media collections, from logos to videos.
DAM systems can be categorised as follows:
-
A brand management system provides a single interface to manage all aspects of a brand’s digital presence, from marketing materials to social media channels. It enforces brand presentation and continuity within an organisation by making the approved logos, fonts, and product images readily available.
-
Library or archive for mass storage of infrequently changing image work, such as video or photo assets.
-
Media asset management systems are used to manage audiovisual assets such as audio, video, and still imagery. These systems automate the process of locating, retrieving, and rendering media files.
-
Production management systems for dealing with on-the-fly digital data assets created for use in live media production or as visual effects in games, television, or films.
-
Streaming is for the on-demand delivery of digital content to end users, such as TV shows or movies, on behalf of digital retailers.
Conclusion: Closing Thoughts
So that brings us to the conclusion of Part 1. I hope it has given you a good taste of what is to come and where to begin when it comes to enhancing your artistic skills for image editing.
Many people have informed me that they do not know where to begin. However, I am hoping that by breaking all of this information down into three parts, it should make it easier to absorb and make progress in your learning journey.
In the next instalment, I will introduce concepts in relation to compositional techniques, photograph cropping, resizing images to capture your viewers’ attention, and how to get started with layers.
The most important thing is to have a goal, a decent idea, and to put emphasis on getting great photos.
If you enjoyed Part 1, this series continues with Part 2, which you can find here.
If you enjoyed this article, please subscribe to my mailing list and share it with your friends, family, and business associates if you think they would be interested. As an independent artist, this kind of support is invaluable.
The time you spent reading this blog is greatly appreciated, thank you.
Please note that I have no affiliation with any of the hardware or software packages discussed in this post.
Rust in P-East
Airbrushed skull on a crackle effect background with patina rust effect, matt varnished, juxtaposed with a strip of gold leaf coated in coloured art resin.
Adrian Reynolds, ‘Ren’, is a contemporary artist based in Dublin, Ireland. His paintings are a response to the world around us. A world that changes faster than ever before. His work explores colour, form, and texture, placing it at the intersection of abstraction and representation. His work has been featured in Ireland, the UK, and the US.
Latest Artwork
-
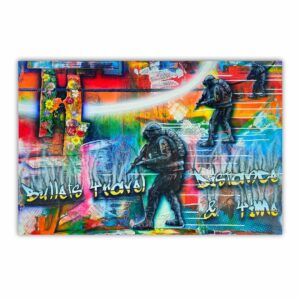
Bullets Travel Distance & Time
Abstract Art Paintings €1,000.00Add to basketBullets Travel Distance & Time | Acrylic Painting By Adrian Reynolds
-
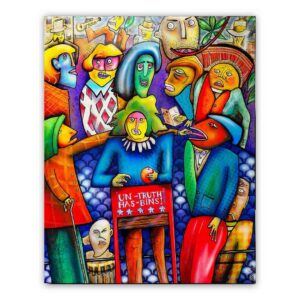
The Perception of Narrative
Abstract Art Paintings €800.00Add to basketThe Perception of Narrative | Fine Art Acrylic Painting By Adrian Reynolds
-
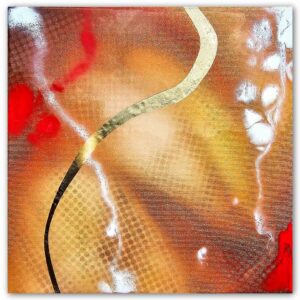
Iridescent Dream
Abstract Art Paintings €240.00Add to basketIridescent Dream | Acrylic Painting By Adrian Reynolds
-
Blue Nebula
Abstract Art Paintings €240.00Add to basketBlue Nebula | Acrylic Painting By Adrian Reynolds