- [email protected]
- +353 (0)86 224 0139
- Free Shipping Worldwide

Fluid Art Techniques | The Ultimate Guide
Fluid art is a fascinating and creative art form that can create stunning and unique paintings.
Learn how to choose your materials, mix your paints, and achieve different effects.
My goal is to make this guide as comprehensive as possible, so that it can serve as a veritable encyclopaedia of fluid arts.
Reading Time: 35 minutes
TL;DR
- Create stunning art easily! Explore fun fluid art techniques perfect for beginners.
- Master unique pours! Learn popular methods and unlock mesmerising cell effects in your paintings.
- Protect your masterpiece! Discover tips for finishing and preserving your fluid art for a professional look.
Unleash Your Inner Artist: Explore Fluid Art Techniques!
Dive into the world of fluid art! This guide unlocks the potential of fluid art for beginners and seasoned artists alike. Discover a variety of techniques, and watch your creativity flow!
No wrong turns here! Experiment and find what feels right for you. This guide isn’t about rules; it’s about having fun and expressing yourself through art.
New to art? Fluid art is a fantastic way to rediscover your creative spark! It’s perfect for families too, as a way to create lasting memories while reaping the benefits of artistic expression together.
Get inspired! I’ve included links to my artwork showcasing these techniques, providing a visual reference to guide you on your fluid art journey.
Ready to unleash your creativity? Let’s explore the exciting world of fluid art!
As art become more popular and accessible to the masses, there still remained the difficulty of acquiring and using oil-based paints.
Introduction: From Grinding Pigments to Ready-Made Colours: A Revolution in Art
Before the 1800s and the rise of commercially produced paints, creating art was a much more laborious process. Imagine artists painstakingly grinding pigments into tiny grains, then mixing them with oil to create paint. This homemade paint not only hardened quickly, requiring daily preparation, but also presented health risks.
Oil paints are slow to dry, require harsh solvents, and often contain toxic additives like lead. These hazards, as seen with the Wedgwood potters and the “Radium Girls,” were often unknowingly absorbed by artists through skin contact or fumes.
The arrival of commercially produced paints during the Industrial Revolution marked a turning point. Art became more accessible as paints were readily available, pre-mixed, and safer to use. This shift allowed artists to focus on their creativity rather than the time-consuming task of paint preparation.
Acrylic Paint: A Game-Changer for Artists
The art world received a major boost in the 1930s thanks to German chemist Otto Röhm. His discovery of polymerizing acrylic acid esters led to the creation of polyacrylate resins, a key ingredient in acrylic paint. This innovation provided artists with a more affordable and user-friendly alternative to traditional paints.
While the initial acrylic paints in the 1940s were solvent-based, the 1950s saw the introduction of water-based acrylics, the type most commonly used today.
The Birth of Acrylic Pouring: From Experimentation to Artistic Expression
Acrylic pouring isn’t entirely new! While the technique may seem trendy, its roots trace back to the 1930s, with Mexican social realist painter David Alfaro Siqueiros. Siqueiros is credited with pioneering this method and even influencing the renowned drip paintings of Jackson Pollock. Pollock later became renowned for his famous all-over paintings, and a major figure in the abstract expressionist art movement.
It all began with experimentation, as artists like Siqueiros explored new ways to manipulate paint and achieve unique effects.
Choosing the Perfect Paint for Fluid Art: A Guide
Fluid art offers endless creative possibilities, but selecting the right paint is key. Here’s a breakdown of popular acrylic paint types and their suitability for different fluid art techniques:
- Soft Body/High Flow/Fluid Acrylics: These paints, with a consistency between milk and heavy cream, are ideal for pouring. They blend easily with the pouring medium, requiring less medium to achieve the desired flow.
- Heavy Body Acrylics: While thicker, heavy body acrylics can be used for pouring but require more pouring medium to reach a suitable viscosity. Some artists thin them with fluid medium first, but avoid adding too much water (maximum 30%) to prevent paint failure. Excessive water weakens the binder, causing the paint to resemble a watercolour wash and lose its vibrancy.
- Student-Grade Acrylics: These typically lack the consistency options of artist-grade paints. While usable for pouring, they generally require more pouring medium to achieve the right flow.
Here are some additional tips:
- Consider your desired outcome. Do you want vibrant colours or a watercolour-like effect?
- Experiment with different brands and types to find your favourites.
Remember: The perfect paint for you depends on your individual needs and artistic goals. Embrace experimentation to discover what works best for your creative journey!
House Paint: A Budget-Friendly Option for Fluid Art
Looking for a cost-effective way to explore fluid art? House paint can be a great alternative to artist-grade acrylics! While their colours may not be as vibrant, house paints offer excellent opacity and can create stunning pieces.
Here’s the appeal:
- Budget-friendly: Tester pots are a cost-effective way to experiment with different colours.
- Large-scale projects: House paint’s affordability makes it ideal for tackling large canvases.
Things to Consider:
- Vibrancy: Be prepared for slightly less intense colours compared to artist-grade acrylics.
- Mixing medium: You’ll likely need more pouring medium to achieve the desired flow with house paint.
House paint can be a fun and affordable way to unleash your creativity in fluid art. Just remember to adjust your expectations for colour vibrancy and plan to use more pouring medium.
Beyond Acrylics: Exploring Inks in Fluid Art
While acrylic paints dominate fluid art, inks offer exciting possibilities! Here’s a closer look:
- Alcohol Inks: Made with alcohol and pigments, these inks create vibrant, fluid effects reminiscent of stained glass. They can be applied wet-on-wet to canvas or paper using rollers or brushes.
- Acrylic Inks: Water-based and pigment-rich acrylic inks won’t damage your artwork surface. They flow well on wet surfaces but may require more manipulation on dry ones. They’re often used for decorative accents on top of acrylic paintings.
Choosing Between Inks and Acrylics:
- Vibrancy: If intense colour is your goal, alcohol inks might be a good fit.
- Surface: Consider your canvas or paper. Acrylic inks work well on both wet and dry surfaces, while alcohol inks require a wet application.
- Experimentation: The best way to discover your preference is to try both!
Inks add another dimension to your fluid art toolbox. Embrace exploration and see where your creativity takes you!
Unlocking the Magic of Acrylic Pouring Medium
Acrylic pouring medium is your secret weapon for creating flawless fluid art! Here’s why it’s worth considering:
- Reduced Blemishes: Compared to cheaper alternatives, pouring medium minimises imperfections that can appear as your artwork dries.
- Self-Levelling: Say goodbye to uneven paint films! Pouring medium ensures a smooth, even finish.
- Less Air Bubbles: The medium helps eliminate air bubbles during pouring. For stubborn bubbles, careful stirring or letting the paint settle can further minimise them.
- Improved Flow: The slightly tacky, honey-like consistency allows for better adherence to your surface, preventing paint from running off the edges.
DIY Pouring Medium: Explore at Your Own Risk
While some artists experiment with DIY pouring mediums using PVA glue (with water), it’s important to understand the potential downsides:
- Unpredictable Results: Mixing PVA with paint can lead to inconsistent viscosity, making it difficult to control your pour.
- Cracking and Tearing: PVA doesn’t account for paint shrinkage during drying, potentially causing cracks or tears in your artwork.
- Limited Archival Quality: PVA may not offer the same longevity as professional pouring mediums.
The Choice is Yours:
PVA glue can be a budget-friendly option for beginners. However, for more consistent results and professional-looking artwork, investing in a dedicated pouring medium is recommended. These mediums often boast a glossy sheen that enhances the final aesthetic.
Finding Your Perfect Canvas: Surfaces for Fluid Art
The beauty of fluid art lies in its versatility! You can create stunning pieces on various surfaces, each offering unique advantages:
- Stretched Canvas: The classic choice for artists, stretched canvases provide a sturdy and professional presentation.
- Canvas Boards: A budget-friendly option, canvas boards are lightweight and easy to store, making them ideal for experimentation.
- Painting Panels: These rigid surfaces offer a smooth texture and resist warping, perfect for detailed work.
Pro Tips:
- For optimal results, use gesso as a primer on any unprimed surface. This white primer creates a slightly textured base that helps your paint adhere better. This is important particularly on unprimed blank canvas, as without gesso the paint would soak into the weave of the material.
- Another way to tighten a canvas is to spray the back with water. Make sure it’s completely covered with water and use a wide brush to spread it around. Once dry it should be nice and taut, when you tap on the canvas it should sound like a drum.
Remember: There’s no single “best” surface. Experiment and see what works best for your artistic vision and budget!
Unleash Your Inner Artist: Essential Fluid Art Supplies
Fluid art lets you create stunning masterpieces, and it’s surprisingly beginner-friendly! Here’s a look at the key tools you’ll need to get started:
Mixing and Pouring:
- Disposable Cups: Easy to hold and perfect for mixing your paint and pouring mediums.
- Craft Sticks or Palette Knives: Great for ensuring your paint and medium are thoroughly mixed.
Protecting Your Workspace:
- Drop Cloths: Old sheets, newspapers, or plastic sheeting will shield your workspace from spills.
- Elevated Surface: Raise your canvas to prevent excess paint from sticking to the bottom when it runs off the sides. Use jars, tins, or even paint tubs of equal height, one under each corner.
For Advanced Techniques (Optional):
Balloons, Colanders, or Funnels: Add unique effects as you experiment with more advanced pouring methods.
Bonus Supplies:
- Apron/Overalls/Old Clothes: Stay protected from paint splatters.
- Latex Gloves (Powder-free): Keep your hands clean and avoid irritation from some mediums.
- Recycled Plastic Containers: Reuse old cups and bottles for mixing paints.
- Hairdryer: Control the flow of paint and create interesting cell effects.
Safety First (Optional):
Fire Blanket/Extinguisher: While unlikely to be needed, having these on hand provides peace of mind when using a heat torch.
Note: This list excludes specialty items like pouring boxes, cake decorating scrapers, and acetate, which are useful for very specific techniques.
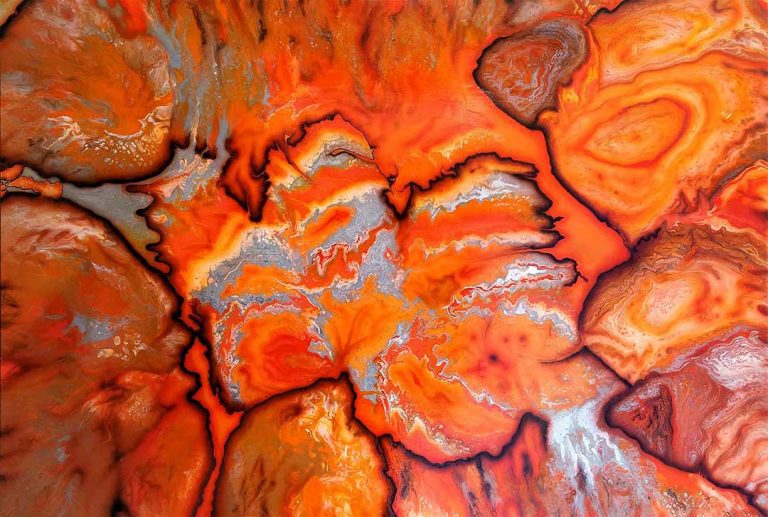
Unlock Hidden Cells in Your Fluid Art!
Fluid art’s popularity stems from its unique, organic effects. This section unlocks the secrets to creating mesmerising “cells” in your paintings—those beautiful pockets of colour.
Creating Cells with Additives
Some artists use dimethicone (a skin-safe silicone oil) to promote cell formation. These cells resemble small, raised colour droplets, giving your art a defined, marbled look.
How it Works: Oil and water repel each other. Silicone acts as a barrier, preventing colours from fully mixing. A drop or two per paint mix is typically used.
Alternatives to Silicone: Isopropyl alcohol can achieve similar effects. It evaporates faster than water-based mediums.
Beginner Tips
- Experiment cautiously with additives. Hardware store silicone oil might be toxic and lack archival quality compared to artist-grade products.
- Additives introduce more unpredictability. Cracked or improperly dried paintings can occur with some techniques.
- Removing oil residue can be time-consuming. Gently rub with a cloth after the paint cures completely. Cornflour helps absorb oil but can be messy.
- I recommend creating a test piece to see how varnishing or applying resin reacts to any remaining oil residue on your finished artwork.
Creating Cells Without Additives
Skilled artists use the varying pigment density of each colour, along with water, to create cells without additives.
Understanding Cells: The Science Behind the Swirls
Fluid art’s magic lies in its unpredictable movement. Let’s delve into the science behind creating stunning cells—those mesmerising colour pockets—without additives!
The Density Dance
One key factor is pigment density. Heavier pigments sink, while lighter ones rise. Imagine gravity pulling down dense paints (like titanium dioxide) while lighter ones (like some yellows) float to the surface. This creates movement and can form cells naturally.
The Science of Swirls (Simplified)
This phenomenon is based on a scientific principle called Rayleigh-Taylor instability, otherwise known as fluid dynamics (don’t worry, you don’t need a degree to understand it!). It basically explains how fluids with different densities react when placed together.
Finding the Perfect Paint
Unfortunately, pigment density information can be hard to find. If you’re up for an adventure, research paint manufacturers who provide this data! This knowledge can help you choose paints that will naturally interact and create stunning cells.
Mastering the Flow: Patience is Your Secret Weapon
Fluid art is about embracing the journey. While results may seem instant, patience is key. Slowing down allows you to connect with the process and materials, building valuable skills for other creative pursuits.
Drying Time:
- Let your masterpiece rest for at least 24 hours. Thick paint or high humidity might extend this to 72 hours.
- Ideally, you should wait a couple of weeks for a complete cure.
Expect Transformation:
Your artwork will shift and morph as it dries—a beautiful surprise! To avoid disrupting this process:
- Keep your work covered and undisturbed.
- Post a “Do Not Touch” sign to prevent accidental smudges.
Embrace the Unexpected:
Fluid art thrives on spontaneity. Though you can influence the outcome, the differences between wet and dry states are part of the magic.
Cover Up:
Protect your drying art! For smaller pieces, use a clean box. For larger ones, create a plastic sheet tent. In fact some paint manufacturers encourage this method as it protects your painting from any potentially damaging air flows and raises the humidity slightly to reduce the stress on the paint film.
Benefits of Covering:
- Shields your work from air flow that might damage the paint film.
- Raises humidity slightly, reducing stress on the paint.
Find Your Level:
A level drying surface is crucial. Unevenness can weaken the paint film.
Fixing Pooling:
If paint accumulates in specific areas, use folded card or paper wedges to prop up your canvas. A spirit level can help ensure stability.
Layering Like a Pro:
When pouring multiple layers, ensure each layer dries completely before adding the next. This prevents cracking and crazing on the surface.
Find Your Perfect Pour: Experimenting with Paint Consistency
There’s no one-size-fits-all recipe for fluid art. Let’s explore some starting points and how to adjust them for stunning results!
Ingredients
- Acrylic Paint: Choose high-quality paints for vibrant colours.
- Pouring Medium: This thins paint and creates a smooth flow. Here are some options to experiment with:
- Pre-made pouring medium: The easiest choice, available at most art stores.
- DIY pouring medium: Here’s a base recipe you can customise:
- Paint Conditioner: Improves paint flow and elasticity (like store-bought mediums).
- High-Quality PVA Glue (small amount): Used sparingly for added body, but avoid using it alone.
- De-ionised Water: While tap water works, de-ionised water eliminates impurities for potentially better results.
- Isopropyl Alcohol (optional): Use with caution! It promotes cell formation but is flammable. Apply with a dropper for controlled effects.
- Acrylic Retarder (optional): Slows drying time, giving you more time to blend or layer colours, more characteristic of oil paint.
Finding the Right Ratio
- Start with a 2:1 ratio (2 parts pouring medium to 1 part paint).
- Adjust based on paint consistency.
- Thick paints (heavy body acrylics) might need a touch of water.
- Thin paints (craft acrylics) might only need a drop of water.
Alternative Recipes (experiment at your own risk)
- 2 parts paint conditioner to 1 part paint (thin consistency).
- 60% PVA glue mixed with 40% water (use 2 parts medium to 1 part paint).
Remember
- Safety first! Isopropyl alcohol is flammable with an alcohol content ranging from 70% (Rubbing) to 99.9% (Isopropyl), so use proper ventilation and caution when using a Chef/Kitchen Blow Torch.
- Less is often more with retarders; a little goes a long way.
Dive into Fluid Art: Explore Techniques for Stunning Results!
Fluid art offers a variety of techniques, each creating unique masterpieces. Let’s explore some common steps and core elements to get you started:
Preparation
- Masking Magic: Apply masking tape to your canvas rear edges or sides for a clean finish.
- Elevated Canvas: Lift your canvas with large pushpins or a pouring box to prevent paint from pooling underneath.
- Colour Choice: Start with 4–5 colors. Consider adding a metallic accent, like gold, copper, or silver.
- Paint Prep: Mix your chosen paints with pouring medium in separate containers. Stir gently to avoid air bubbles.
- Basecoat Basics: Cover your canvas with a base colour (white or black works well for beginners) to create a high-contrast background.
Layering Like a Pro
- Use a layering cup or any container with a pouring spout.
- Tilt the cup slightly and gently pour your paint down the side. This allows each colour to settle gently on top of the others, minimising mixing.
Fluid Art Techniques: Pours
The magic of fluid art happens when you pour different-density paints onto a canvas. These contrasting weights create stunning visual effects! Dive into these techniques to explore different approaches:
(Note: There may be some overlap in naming conventions between methods.)
Bottle/Funnel Pour
This technique utilises a recycled bottle or funnel to create stunning spiral patterns.
- Prepare your canvas: Place it flat and choose your starting point for the spiral.
- Prepare your paint: Mix your desired colours beforehand, considering how they’ll layer in the final pour.
- Fill the funnel: Cover the bottom with your hand and slowly pour in the paints, layering them as desired.
- Release and spiral: Lift your hand to start the pour. Instead of straight lines, gently swirl the funnel around the initial puddle, creating a colourful spiral.
- Continue and complete: Keep pouring and swirling until you’re happy with the design. Tilt the canvas for even coverage, and remove the funnel carefully to avoid drips.
Bottle Bottom Pour
This fun technique uses a recycled bottle bottom to create unique designs.
- Prep your canvas: Apply a thin base coat to your entire canvas.
- Position the bottle: Place the cut-off bottom of a plastic bottle where you want your design to begin.
- Pour and layer: Carefully pour your chosen paints (contrasting colours work best) into the centre well of the bottle bottom. Layer additional paints for a larger design.
- Manipulate the paint (optional): To spread the paint, gently tilt your canvas in circles.
- Add details (optional): Use a skewer or popsicle stick to drag lines inward and outward from the centre for more intricate patterns.
Clean Pour (Perfect for Beginners!)
The clean pour is a fantastic introduction to fluid art! It involves pouring single colours directly onto your canvas, creating beautiful and unexpected patterns.
Here’s how to get started:
- Pick your colors: Choose 2-3 colours to avoid muddied results.
- Mix your paints: Combine each colour with the pouring medium in separate cups.
- Prime your canvas (optional): Apply a wet base coat for added vibrancy.
- Pour and play: Carefully pour each colour onto your canvas, creating your desired composition.
- Let it flow: Tilt the canvas back and forth, encouraging the paints to mix and cover the surface. Observe the unique patterns that emerge!
- Dry and admire: Once you’re happy, leave your artwork to dry under a box.
Practice tip: Experiment with pouring on small canvases or boards to understand how the paint behaves.

Cloud Pour: Dreamy Canvas Creations
Create ethereal clouds on your canvas with the cloud pour technique! This method uses “cells”—fluffy white pockets—to achieve a dreamy effect.
The Secret Ingredient
Satin enamel paint! While DecoArt Americana is popular, you can experiment with leftover interior house paint for a budget-friendly option.
Colander Pour: Stunning Swirls
The colander pour creates mesmerising, swirling patterns on your canvas. It’s best suited for circular surfaces that can be rotated on a turntable.
Here’s the magic:
- Unmixed layers: Keep your paint colours somewhat separate in the layering cup. They’ll blend significantly in the colander.
- Spin and pour: Place your canvas on a turntable and pour the unmixed paints through a colander held above. As you spin the canvas, the paint creates captivating swirls.
Bonus tip: Experiment with different paint consistencies and spinning speeds for unique effects.
Density Pour: Stunning Cell Effects
The density pour creates beautiful “cell” formations within the paint. Here’s how to achieve this mesmerising effect:
Prepare your paints:
- Mix it up: Thoroughly mix each colour with the pouring medium in separate cups.
- Cell control (optional): Add a few drops of silicone oil to each cup for larger cells, or more for smaller ones.
Prime your canvas (optional):
Apply a base coat in a contrasting colour to make your final artwork pop.
Pour and swirl:
- Layer your colours: In a large cup, slowly pour your mixed colours one at a time, alternating them without stirring.
- Release the art: Pour the combined paints onto your primed canvas in a circular motion, creating colour rings.
- Tilt and manipulate: Gently tilt your canvas in different directions to spread the paint and enhance the colour rings.
Bonus tip: Experiment with different paint consistencies and tilting motions for unique cell formations.
Dip-Pour: Create Printed Designs
The dip pour lets you create unique designs on your canvas by “printing” them from a painted surface. Here’s how to get started:
Prepare your workspace:
- Clean and cover: Cover your work surface with a clear plastic sheet, ensuring it’s clean, dust-free, and taped down at the corners.
- Mark your canvas: Place your canvas on the sheet and lightly mark its outline with enough space for paint.
Create your base:
- Fill in the outline: Use a paint/pouring medium mix to fill the marked area on the plastic sheet. Smooth it with a palette knife.
- Design time: Paint your desired design on top of the base (segments, dirty pour, etc.). Let your creativity flow!
Transfer to canvas:
- Cover and smooth: Once your design is complete, cover it with the same base paint/pouring medium mix, smoothing it out with a palette knife or your fingers.
- Press and transfer: Gently press your canvas onto the painted plastic sheet, ensuring all paint makes contact.
- Release and reveal: Carefully remove the plastic taping and flip the canvas or plastic over. Prick air bubbles with a needle.
- Separate and admire: Flip the canvas back down, tape the plastic sheet to secure it, and slowly peel the canvas away to reveal your creation!
Dutch Pour: Delicate Details and Lacing Effects
One of my very favourite techniques of acrylic pour painting is Dutch pour painting. Originally coined and created by the fantastic Dutch artist Rinske Douna, the Dutch pour is a technique that produces delicate ribbons of colour and beautiful lacing details.
Dustpan Pour: Effortless Lines and Swirls
The dustpan pour lets you create stunning lines and swirls with household items! Here’s how to get started:
- Prime your canvas (optional): Apply a base coat for smoother paint flow.
- Load your dustpan: Play with colour combinations! Layer your chosen paints in a dustpan however you like. The order can affect the final design, so experiment!
- Tilt and pour: Gently tilt the dustpan to transfer the paint onto your canvas. As you pour, move the dustpan from side to side to create captivating lines and swirls.
Bonus tip: Experiment with different paint consistencies and tilting speeds for unique effects.
Embellished Pour: Take Your Art Further
The magic of fluid art doesn’t stop with the pour! Embellished pours add another layer of creativity to your artwork. Here are some ideas to get you started:
While Pouring:
Crushed glass or glitter: Sprinkle them onto your wet paint for sparkling textures.
After Pouring (Once Dry):
- Drawing and Stencils: Enhance your design with detailed lines, shapes, or patterns using pens, markers, or stencils.
- Dimensional Elements: Add a 3D touch with crushed glass, gems, sand, rocks, or even shells!
Kiss Pour: Striking Colour Contrasts
The Kiss Pour creates stunning artwork with bold colour contrasts. Here’s how to achieve this unique effect:
Prepare your canvas:
Base coat (optional): Apply a thin layer of white or black paint to your canvas for better colour vibrancy.
Prepare your paints:
Colour cups: Create two separate cups with contrasting colour themes. For example, one cup can hold warm colours (red, orange, and yellow) and the other cool colours (blue, green, and purple).
Layered magic: In each cup, layer your chosen colours one on top of another. Gently pour the colours down the sides of the cup to maintain distinct layers.
The kiss:
Simultaneous pour: Pour both cups of paint at the same time, aiming for their puddles to touch on the canvas.
Wiggle and tilt: As you pour, gently wiggle the pouring stream to create interesting patterns. Once you’re happy with the paint distribution, tilt your canvas for even coverage.
Let it dry and enjoy!
Hammer Pour: Unleash Creative Chaos (Safely!)
The hammer pour lets you create unique splatter and splatter effects with a bit of playful “destruction.” However, safety comes first!
Here’s what you’ll need:
- Sturdy surface: A canvas can work, but a hard, non-absorbent surface like wood is ideal.
- Paint application: Apply your chosen paints using any method you like, like the puddle pour.
Let’s get smashing (carefully):
- Prep your surface: Apply a thin base coat of paint to your hard surface.
- Create puddles: Pour small puddles of different colours (1-2 inches wide) across the surface.
- Gentle taps: Using a hammer, mallet, or even a balloon, lightly tap the centre of each puddle. Start slow! The harder you tap, the more splatter you’ll get.
- Build your art: Continue tapping to create your desired effect, adding more paint as needed. Be mindful of potential messes!
Safety tip: Wear protective gear like gloves and a smock to avoid paint splatter on yourself and your surroundings.
Negative Space Pour: Art from the Absence
In art, negative space refers to the areas surrounding and between the subject of an image. This space can be just as important as the subject itself, and artists sometimes use it to create a striking visual effect. The negative space pour technique takes advantage of this concept to create captivating artwork.
Here’s how you can use negative space pouring:
Prepare your canvas:
Choose a base colour (white or black works well) and cover your entire canvas.
The Pour:
- Less is more: Select a contrasting colour and pour a small amount onto your canvas. Avoid covering the entire surface – this negative space is key!
- Reverse approach (optional): Pour your chosen colour first, then use the base colour to cover the rest of the canvas. This creates minimal interaction between the colours.
Let it flow carefully:
You can gently tilt your canvas to spread the paint, but be mindful of preserving the negative space.
Bonus tip: Experiment with different paint consistencies and pouring techniques to create unique effects within the negative space.
Pendulum Art: Where Science Meets Imagination
Pendulum art is a captivating art form that uses gravity’s influence to create mesmerising patterns and designs as a pendulum swings paint onto a canvas. Each swing creates a visual record of the pendulum’s movement, capturing a sense of both motion and flow.
The size of the paint opening and the paint’s consistency shape each stroke and add depth to the artwork. Artists carefully control the pendulum’s movement using different string lengths, weights, and angles. In this way, pendulum art allows artists to create by combining their creativity with the unpredictable nature of physics.
Creating Your Pendulum Art Masterpiece
Ready to try your hand at pendulum art? Here’s a basic setup:
- Secure a string to a hook in the ceiling or a sturdy stand.
- Attach a cup or container with a small hole at the bottom to the other end of the string.
- Fill the cup with pre-mixed fluid acrylic paint thinned to a pouring consistency (similar to what you’d use in dirty pours).
- Place your canvas beneath the pendulum, ensuring the paint drips freely onto the surface.
- Experiment with gently swaying the pendulum or letting it swing freely to create different patterns.
The Link to Fluid Art: A Dance of Gravity and Flow
Pendulum art falls under the umbrella of fluid art, a category encompassing various techniques that utilise pouring mediums to create abstract designs. Both art forms share the element of surrendering some control to the flow of paint. While fluid art often relies on tilting or manipulating the canvas, pendulum art utilises the swinging motion to achieve its unique effects.
So step back and be entranced by pendulum art, a dance between science and imagination. Let its fluidity, unpredictability, and ability to capture both movement and stillness inspire you. It reminds us that true beauty lies not only in what we create but also in how we connect with the world around us.
Puddle Pour: Playful Pools of Colour
The puddle pour is a fun twist on traditional pouring, creating vibrant designs with colourful puddles.
Getting Started:
- Mix your paints: Prepare your chosen colours by mixing them with pouring medium in separate cups.
- Prime your canvas (optional): Apply a base coat in white or another colour for added contrast.
Creating Puddles:
- Layer your colours: Choose a dark colour that will stand out against your base. Add small “puddles” of this colour to your canvas in your desired pattern (linear, random, etc.).
- Slow and steady: Gently pour a contrasting colour in the centre of each puddle. Take your time to avoid drips and bubbles.
- Repeat and explore: Continue adding puddles with your remaining colours, alternating or repeating as you like. Remember, more paint creates thicker puddles in the centre.
Tilt and Flow:
- Gently tilt: Once you’re happy with your puddles, tilt your canvas to spread the paint and create interesting flows.
- Even coverage: Aim for a relatively even paint film for a uniform drying process.
Bonus Tip: Experiment with different colour combinations and puddle placement to discover unique abstract effects!
Learning Through Practice:
Both puddle and traditional pouring techniques offer solid colour results. Practice with both to observe how the paint behaves and how you can control colour blending and layering. Over time, you’ll develop your own style and preferences!
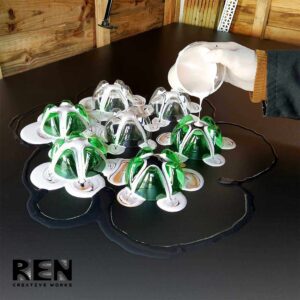
Ring Pour Magic: Unleash Stunning Effects!
Ready to create stunning artwork with vibrant colors? The ring-pour technique is your key! It lets you layer fluid acrylics to achieve mesmerising cell formations and captivating patterns.
Master the Stack
The secret to ring pouring lies in layering your paints carefully. Imagine your cup as a cake pan; each colour goes on top of the last, keeping them beautifully separated. Thicker is better here. Thicker paint prevents unwanted colour mixing.
Thicken Your Mix
Here are some tips for thicker paint:
- Skip the water: Thinning with water is a no-no for ring pours.
- Heavy body: Use heavy-bodied acrylic paints for a naturally thicker consistency.
- Pigment power: Add white, black, or other thick pigments to your paints for extra body.
Experiment with Your Tools
Don’t be afraid to break free from the round cup! Square or angled cups offer exciting possibilities. Pouring from a corner gives you more control over the paint flow, creating unique line thicknesses and pour speeds.
Double the Fun with Divided Cups
(Optional) Pre-made pouring cups with dividers are available, allowing you to separate colours and create stunning tree ring effects.
Patience is Key
Once you’ve poured your masterpiece, let it rest for a moment to allow the paint to settle.
Tilt Wisely
Resist the urge to over-tilt your canvas! Excessive tilting muddies the colors. Use a generous amount of paint in your cup to keep lines crisp, minimising the tilt needed to cover the canvas.
Get Started and Be Amazed!
With a little practice, you’ll be creating breathtaking ring pours in no time. So grab your paints, unleash your creativity, and witness the magic of fluid art!
Flip Cup Fun: Unleash Colourful Chaos!
Ready for a dynamic, fluid art experience? Look no further than the Flip Cup technique! It’s similar to the Dirty Pour, but with a dramatic twist—flipping the paint cup!
Flipping for Fun
Here’s the gist: Fill a cup with your chosen colours. Then, with the canvas facing down, carefully place it on top of the cup. Flip them both together in a swift, controlled motion, letting the paint flow freely onto the canvas.
Be a Flip Cup Master!
While it might seem messy at first (and that’s okay!), here are some tips for a smoother flip:
- Prep like a pro: Prepare your paint mixture as you would for a dirty pour. Remember, paint layering affects the final design!
- Steady does it: Place the cup in the centre and ensure it’s stable. Put the canvas face-down on top, centred.
- The Big Flip: Use one hand to hold the canvas steady, the other firmly gripping the cup. Flip both together carefully, preventing paint spills. The canvas should now be face-up with the cup resting on it.
- Breaking the Seal: When removing the cup, it might create suction. Give it a quick, angled pull to avoid drips.
- Flow and Finesse: Gently tilt the canvas to encourage paint flow and fill every corner. Tilting too fast creates a “stretched” effect. Use a brush or finger for any unpainted edges.
Get Flipping!
With a little practice, you’ll be a Flip Cup pro in no time. So grab your paints, embrace the unexpected, and witness the magic of fluid art unfold!
Flip Cup & Drag: Where Chaos Meets Control
Love the unpredictable beauty of the Flip Cup? Take it a step further with the Flip Cup and Drag technique! It’s all about adding a dramatic twist after the initial flip.
The Drag Difference
Instead of lifting the cup straight up, you’ll drag it across the canvas face-down. This creates mesmerising streaks and shapes, adding a whole new dimension to your artwork.
Mastering the Drag
Here’s how to add that special touch:
- Follow all the steps for a regular Flip Cup, ensuring a good paint flow onto the canvas.
- With the cup resting upside down on the canvas, gently but firmly drag it across the surface. Experiment with different dragging directions for unique effects.
Tips for a Winning Drag
- Control the Chaos: Apply a gentle pressure while dragging to maintain some control over the paint movement.
- Embrace the Unexpected: Don’t be afraid to experiment with different dragging speeds and directions. The beauty lies in the unpredictable results!
Unleash Your Creativity!
The Flip Cup & Drag technique is a fantastic way to explore the world of fluid art and create one-of-a-kind masterpieces. So grab your paints, embrace the unexpected, and witness the magic of dragging your way to artistic expression!
Floating Magic: Unveiling Stunning Fluid Designs
The floating cup technique allows you to create captivating fluid art with mesmerising cell formations and vibrant colour interactions. Here’s how to unleash your creativity:
Prepare Your Canvas:
Apply a light, wet base coat to your canvas. This helps the paint adhere and creates interesting effects.
Layer Your colours:
Fill your cup with your chosen colours, carefully layering them on top of each other. Imagine building a colourful cake!
The Big Flip:
- Just like in a flip cup pour, carefully flip your canvas face-down onto the cup, ensuring they’re centred.
- With a swift, controlled motion, flip both the canvas and cup together as one unit.
Release and Slide:
- Create a small opening in the top of the cup (a pre-made hole, or poke a new one). You can also achieve this by slightly lifting the cup from the canvas.
- Gently slide the cup across the canvas, guiding the paint flow in your desired pattern.
Refine Your Masterpiece:
- Use a hairdryer or straw to blow paint outward from the edges of your design, adding dimension.
- Don’t be afraid to tilt the canvas or manipulate the paint with tools for unique effects.
Embrace the Flow:
The beauty of this technique lies in its flexibility. Experiment and have fun until you achieve a composition you love!
Swipe Sensational: Mastering the Fluid Art Swipe Technique
The swipe technique in fluid art adds a whole new dimension to your creations! Here’s a breakdown to get you started:
Gather Your Tools:
Unlike other techniques, swipes require a dedicated tool to manipulate the paint. But fear not; you have options!
- Classic Tools: You can use a long palette knife, a frosting spatula, or even a transparency sheet.
- Household Heroes: For a budget-friendly option, even wax paper or cling film can do the trick!
Choose Your Base Pour:
The beauty of the swipe is its versatility. You can use almost any acrylic pouring technique for the base—traditional pour, dirty pour—the choice is yours! Just ensure the entire canvas is covered.
Planning Your Swipe:
- Direction: Decide how you want your swipe to move across the canvas. You can swipe from one side, a central line, or even outwards for a starburst effect.
- Confidence is Key: Beginners might find starting from the side easiest, while more experienced artists can try bolder swipes.
Adding the Swipe Colour:
Thin is In: Pour a thin line of your chosen “swipe colour” along your desired swipe path. Remember, less is more! A thick line will result in a solid-coloured stripe instead of the beautiful swiped effect. Aim for a line between 1cm – 3cm (½” – 1”) wide.
The Big Swipe!
- Select Your Tool: Choose your swipe tool of choice.
- Gently Glide: With a smooth, controlled motion, drag your chosen tool across the canvas, spreading and manipulating the paint to create your design.
Experiment and Have Fun!
The swipe technique encourages exploration. Feel free to experiment with different swipe directions, tools, and paint consistency to discover what works for you. Let your creativity flow, and enjoy the unique results!
Bloom Where You’re Planted: Mastering the String Pull Technique
Ready to elevate your fluid art skills? Look no further than the string pull technique, a captivating way to create stunning flower-like designs!
Gearing Up:
- String Symphony: You’ll need short pieces of string, twine, or even a chain. Experiment with different textures for unique effects!
- Colour Coded: Prepare separate cups for each paint colour you want to use. Dip a piece of string into each cup, leaving a long end for easy handling. Choose string lengths based on your canvas size; hold them up to the canvas to visualise the final design.
Setting the Stage:
Contrasting Canvas: Apply a base coat of fluid paint in a colour contrasting your chosen string olors. Use a palette knife to smooth it out for a clean foundation.
Blooming Beauty:
- Coiling Your Masterpiece: On the canvas, carefully coil one of your paint-soaked strings. You can arrange it however you like, but remember to leave an unpainted end hanging over the edge for easy removal later.
- Composition is Key: Repeat the coiling process with your other strings, arranging them on the canvas until you’re happy with the overall design.
The Grand Reveal:
- Pulling Power: Now comes the exciting part! With a steady hand, gently pull each string straight up from the centre of the canvas. This will drag the paint downward, creating mesmerising flower-like shapes.
- Farewell Strings: Once you’ve pulled all the strings, carefully remove them from the edges of the canvas.
A Work of Art Blooms:
Behold! Your canvas should now be adorned with stunning, leafy, and floral impressions in your chosen colors. Perfect consistency is key to mastering this technique, so don’t be discouraged if it takes a few tries. But once you get it right, the results are truly rewarding!
Protect Your Artwork for Lasting Beauty
Art enriches our lives, but to preserve its beauty and value, proper protection is crucial. Here are two key methods to safeguard your creations:
Option 1: Sealing with Acrylic Varnish: Shine or Subtle Protection
Acrylic varnish safeguards your artwork from sunlight damage and water. It comes in matte, satin, or gloss finishes to create different effects. You can even combine finishes on a single piece for a unique look!
Apply varnish with a brush for precise control. For spraying with an airbrush, thin the varnish slightly with water.
Liquid varnish spreads easily and dries quickly. Avoid over-brushing; apply several thin coats instead. Let the varnish dry completely for a few hours.
Option 2: Sealing with Epoxy Resin: Long-Lasting Protection with a Glossy Finish
Ultimate Protection: Epoxy resin offers permanent, waterproof sealing for your artwork. Unlike varnish (usually painted on), it’s poured like thick, clear honey, covering every inch. Epoxy takes longer to dry (24 hours to touch, 72 hours to fully cure) compared to varnish, but it boasts superior UV resistance.
Glossy Finish and Scratch Resistance: This two-part system (resin and hardener) creates a high-gloss, scratch-resistant finish when cured.
Mixing and Applying: Follow the instructions for mixing resin and hardener. Pour slowly to avoid air bubbles, and use a spatula to spread evenly.
Dealing with Air Bubbles:
- Wait to see if small bubbles disappear on their own.
- Gently press stubborn bubbles with a spatula.
- For larger areas, use a heat gun (safely!) to pop them; keep moving the flame to avoid burning the resin.
Perfection Requires Preparation: Dust and hair show up easily in resin. Thankfully, it’s forgiving! Sand out blemishes and imperfections, then refinish with a light coat.
Epoxy Resin Art Techniques (for another section):
This section dives into artistic techniques for creating unique resin art using brushes, stamps, stencils, and more to create multi-layered illustrations and form textures.
Learning how to work with these tools and methods can greatly enhance your artistic abilities and provide opportunities for you to create pieces that are uniquely your own.
Top Tips: Gear Up for Easy Cleanup
- I strongly recommend that you wear protective gloves. I am prone to contact dermatitis, an allergic reaction and rash caused by direct contact with some of the materials used in this process.
- When working with dangerous chemicals and other materials, it is critical to wear gloves to protect our hands from illness and contamination. The hazards should be considered when choosing protective gloves, as follows:
- Nitrile gloves are resistant to the majority of chemicals and pathogenic pathogens.
- Rubber gloves provide protection against mildly corrosive materials.
- Neoprene gloves are resistant to most solvents, oils, and mild corrosives;
- Avoid wearing latex gloves because you might find that you are allergic to them or develop sensitivities.
- Wear an apron or lab coat and cover your workspace well while working with resin, as it can be messy and tricky to clean up.
- Make clean-up easy by using disposable gloves, lining your work surface with vinyl shower curtains, and providing drop sheets on the ground.
- Never pour epoxy resin down the drain! You should clean out all containers and wipe down reusable plastic fluid art tools with paper towels.
- Remove all residue by wiping it down again with either rubbing alcohol or, if using acetone, opening a window. After that, you can wash it with hot, soapy water. Alternatively, any remaining residue can simply be allowed to cure on plastic tools and peeled off the next day once it has cured.
Sealing the surface of your work of art will protect it from water and the environment it is in.
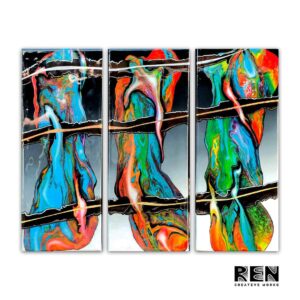
Want to see my creative process in action? Read more about how I made one of my pieces from start to finish.
Conclusion: Fluid Art: Endless Creativity for Everyone
This guide has introduced you to the wonders of fluid art—a world brimming with possibilities! Whether you’re a beginner or a seasoned artist, fluid art offers a unique and exciting way to unleash your creativity.
Feeling overwhelmed by the options? Don’t worry! This guide equips you with the basics to get started. Share it with anyone who might be interested—fluid art is for everyone!
If you have questions or suggestions, feel free to leave a comment below. Happy pouring!
Ready to take it further? If you would like to commission a fluid art piece with specific colours, you can find out more here.
Like this article? Show your support by subscribing and sharing it with your network! As an independent artist, your appreciation means a lot. Thanks for reading!
Stay connected! Subscribe for future articles and updates.
Adrian Reynolds, or ‘Ren,’ is a Dublin-based contemporary artist. His works are a reaction to the world around us. A world that continues to evolve quicker than ever. His work investigates colour, form, and texture, putting them at the intersection of abstraction and representation. His art has been shown in Ireland, the United Kingdom, and the United States.
Latest Artwork
-
Mono to Chromatic Convergence
Abstract Art Paintings €400.00Add to basketMono to Chromatic Convergence | Fine Art by Adrian Reynolds
-
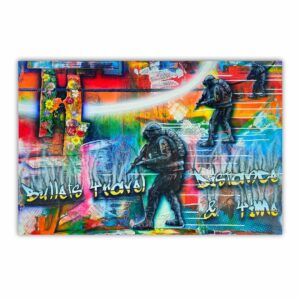
Bullets Travel Distance & Time
Abstract Art Paintings €1,000.00Add to basketBullets Travel Distance & Time | Acrylic Painting By Adrian Reynolds
-
The Perception of Narrative
Abstract Art Paintings €800.00Add to basketThe Perception of Narrative | Fine Art Acrylic Painting By Adrian Reynolds
-
Iridescent Dream
Abstract Art Paintings €240.00Add to basketIridescent Dream | Acrylic Painting By Adrian Reynolds